From time to time we get asked by productions as to how we would like the picture editor to provide materials for a sound post booking. Even though workflows are forever evolving, there are universally accepted standards that stood the test of time, and here we will outline these basic expectations.
This article is aimed at editors both novice and intermediate. Producers should also take notice because the following good practices of an editor will save the production money in sound-post stage.
Tracklay
First things first, your sound post person will LOVE you if you gave your timeline a once over and tidied up the track-lay. It’s best you do this because by now you are the person most familiar with the material at hand.
A basic rule of thumb is that foreground stuff go on the top tracks, and background stuff on the bottom. A typical tracklay should look like this:
A1 Guide Narration / VO
A2 Sync dialog / PTC
A3 Sync dialog / PTC
A4 BG dialog / pfx
A5 BG dialog / pfx
A6-10 Sfx
A11-12 Stereo Music
The idea is to organise tracks in food groups and minimise track count as much as possible.
(It would be extra special nice if you checker-boarded dialog between different scenes, and checker-boarded your music tracks.)
If there are more than 1 choice for sound (i.e boom & lav), then put both options on the timeline, unless one side is completely useless. However, don’t mute or delete the unwanted clip unless you are 1000% sure it is not usable.
Cut it, don’t bend it.
If there are unwanted audio in the b-roll or cutaway shots, like random talking, please delete them off the timeline. Using the volume pane to mute these clips is not a good practice, it can cause confusion down the line as all of that volume automation will be lost by the time the engineer starts mixing, and that random audio may well make it into the mix. This also applies to music fades. Do all the fades with the fade tool -not the volume lane- so your intentions aren’t lost in translation.
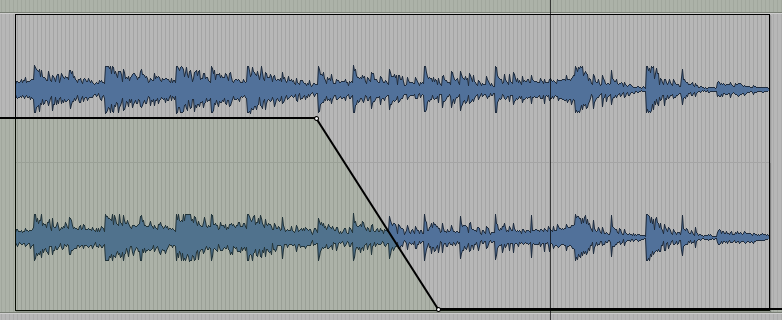
An example of “Editing with Volume”
Don’t burn it.
Please do not multiply the same clip to make it louder, use clip gain or other plugins if possible. But please don’t burn in any plugin effects, be it Eq, noise reduction or gain. If there is a specific effect you have put and would want it in the mix then please supply both the unaltered clip and the processed clip on the timeline.
If you have received room tones and atmos recordings, please include them either further down on your timeline, or as a separate AAF/OMF. Or by all means cut them into the scenes. But don’t attempt to loop a 2 second room tone, it never works.

The dreaded “bad-loop room tone”
Music moves
If you are cutting the music tight with the pictures, i.e if there are musical moments in sync with the action, then make sure all your music cuts / loops are near perfect, or acceptable. A big long crossfade won’t fix the join if it’s not musical to start with. What will happen if the engineer can’t fix the join is that you will end up with a fade-out to carry the story to the next scene instead of that nice big resolute ending you had in mind.
Speaking of music, it is nice to end a story with those hits, but sometimes production tracks gradually get too big towards the end, making the ending not suitable to bud against the mellow first minute. Again, you will end up with a long fade…
Sloppy joe
If you’re putting in cutaway audio from different sources, make sure the audio doesn’t extend outside the clip boundaries more than a frame either side. It can be very time consuming and confusing to sift through lots of overlapping clips and cut them within their appropriate shots.
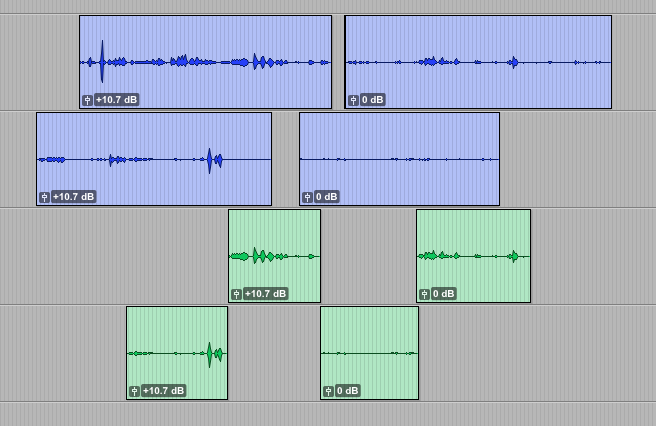
Properly edited green clips are what the blue clips should look like
Frankenbite. The unavoidable speech salad. But sometimes it’s OK to say “no can do”. Contrary to popular belief, soundies do not have magic buttons to make a mangled up dialogue sound smooth. But if you have to steal a word from somewhere, please give all the options available, including the outtakes.
Once the timeline is good to go, there are a couple of things to check in your export settings to ensure your output will be as universal as possible.
Export away
Pictures: If you are delivering on a hard disk, it’s best to use good resolution codecs like Apple Prores, AVID DNxHD, etc. Lossy formats like h264 or mp4 are great space savers but they are not ideal to work with in professional environments. However most people accept these formats as they are easy to haul around. Then they get converted to pro codecs.
OMF/AAF: When creating these files please make sure to not include the video tracks. For audio file type, always choose Embedded Media, 48kHz. Also please include lots of handles. Having the flexibility of 3-5 second handles goes a long way.
It is a good sign of pro skills if your video includes some lead in time along with pips, and burnt in timecode. As the industry slowly moved away form tape based media into file based deliveries, countdowns and 2 pips have also disappeared but these are essential for marrying your deliverables in sync. Now, when we receive pictures we assume that they start at 01:00:00:00 unless there is burnt in timecode and/or countdown.
A guide mix is also important to have on the quicktime file, as we refer to it for sync, and sometimes to clarify sound edit decisions. But don’t expect the engineer to listen to the guide mix from top to bottom to get inspiration. The best way to communicate sound design / mix needs that aren’t strikingly obvious from the OMF and pictures is via detailed notes on paper (or pdf). Another way to get your message across is by way of adding text graphics overlays (upper/lower thirds) on the shots in question e.g “Door banging sfx”. Talking things over with your sound guy can also be good.
Lastly, naming. We can not stress how important proper naming and versioning is. Your OMF and Quicktime files should both have the same name that includes at least one word or an abbreviation of the programme title. And each subsequent version that is delivered should be named accordingly, e.g. FeedbackToCR_Cut_v1, FeedbackToCR_Cut_v2. You should also date the file names. If you will be delivering re-cut versions, we need the EDLs of the original cut as well as the re-edits.
Here is a great guide for creating EDLs for Sound Post
We hope this helps young editors understand what is expected from them in the sound post suite.
Our preferred requirements for deliverables
Quicktime DNxHD, data rate: 36Mbps size: 1920×1080 (with guide mix, or Dialog on left M&E on right channel for ADR. With burnt in timecode, picture start at 01:00:00:00)
AAF with 24bit audio. If embedded, trim clips with 150-200 frames handles. If linked, please supply the media files as well.
or OMF with embedded media. (OMF is limited to 2GB, so you’ll need to split your export. A good way is to export music tracks separately.)
With every version of Media Composer or Premiere, there are new bugs introduced to AAF and OMF creation.
These bugs usually stem from using embedded clips or mixed frame rate media, or any other new feature of the NLE.
Please organise a test with us to see if your output works with Pro Tools to eliminate the chance of a last minute headache.
For film projects we also need sound rushes supplied on a separate drive.